Introduction
Jambo pour Outlookvous permet d'enregistrer des courriels et des événements en tant qu'enregistrements de communication dans votre projet Jambo. Lorsque vous utilisez le module complémentaire Outlook pour créer un enregistrement de communication Jambo, vous pouvez compléter les éléments suivants champs champs supplémentaires, ce qui facilite l'obtention d'un enregistrement plus complet.
Configuration requise (v1.3.7 - mise à jour juillet 2025)
Jambo pour Outlook utilise les exigences de l'ensemble 1.12 de l'API JavaScript d'Outlook.
Pour savoir si votre version d'Outlook est prise en charge,veuillez consulter ce lien.
Jambo nécessite également un accès à l'API graphique. Il se peut que l'administrateur de votre organisation doive autoriser l'accès.
Installation de Jambo pour Outlook
Processus d'installation recommandé :
Il est recommandé que le complément Jambo pour Outlook soit installé par un administrateur de l'organisation.
Note: Le complément Jambo pour Outlook possède des fonctions qui utilisent l'activation par événement (SmartAlert) pour aider les utilisateurs à ajouter des courriels à Jambo au moment de l'envoi du courriel. Selon la documentation de Microsoft (https://learn.microsoft.com/en-us/office/dev/add-ins/publish/autolaunch-store-options) "Les compléments doivent être déployés par les administrateurs d'une organisation pour que les utilisateurs finaux puissent accéder à l'activation basée sur les événements.activation basée sur un événementbasée sur un événement"
Contactez votre administrateur informatique pour effectuer les démarches suivantes
Étape 1 : Accéder au centre d'administration Microsoft 365

Étape 2 : Cliquez sur Obtenir des applications

Cela ouvrira AppSource

Étape 3 : Recherche de Jambo

Étape 4 : Cliquez sur "Get it now" et acceptez les conditions d'utilisation et la politique de confidentialité.

Étape 5 : Ajouter des utilisateurs
Vous pouvez faire des ajouts pour l'ensemble de votre organisation ou pour des utilisateurs et des groupes spécifiques.

Étape 6 : Demande d'autorisation d'accès

Étape 7 :
Examen et fin du déploiement


Note: Cela peut prendre un certain temps (jusqu'à 72 heures) pour que le complément soit déployé à tous les utilisateurs.
Installation à partir de la boutique Microsoft 365 et de la boutique Copilot :
Note: L'installation à l'aide de cette méthode peut entraîner des problèmes avec la fonctionnalité d'envoi de messages. Si vous n'utilisez le complément que pour envoyer des e-mails existants à Jambo, vous pouvez l'installer directement depuis le magasin.
Installez Jambo pour Outlook à partir de la boutique Microsoft 365 in-app, à laquelle vous pouvez accéder depuis votre ruban dans Outlook.

- Recherchez Jambo.
- Cliquez sur le bouton "Ajouter" sur la page du magasin.
Si vous ne parvenez pas à installer les modules complémentaires, vous pouvez contacter votre service informatique. L'équipe Jambo chargée de la réussite des clients peut aider votre équipe informatique à obtenir les informations dont elle a besoin pour les compléments gérés par l'administrateur.support@jambo.cloud.
Accès à Jambo pour Outlook
Une fois installé, vous pouvez accéder à Jambo pour Outlook chaque fois que vous consultez un e-mail nouveau ou existant.
Windows : New Outlook et Outlook sur le Web
Dans Outlook sur le web et New Outlook sur Windows, Jambo pour Outlook est accessible dans la barre d'outils ou en haut à droite d'un e-mail que vous consultez. Si vous avez plusieurs add-ins, il peut être caché dans le menu ellipses (trois points) dans le coin supérieur droit de la barre d'actions de l'e-mail, à côté des actions Répondre, Répondre à tous et Transférer.

Windows : Outlook (Classic) MISE À JOUR (juillet 2025)
Note: Le ruban peut être masqué pour certains utilisateurs lorsqu'ils consultent des courriels existants. Pour restaurer le ruban, cliquez ou double-cliquez sur l'élément de menu "Accueil".

Vous verrez alors Jambo dans le ruban

Dans Windows Outlook (Classic), si vous avez beaucoup d'éléments dans votre ruban et que vous utilisez le ruban simplifié, vous pouvez accéder à Jambo pour Outlook via les ellipses (trois points) situées dans votre ruban d'accueil.

Il est également possible qu'il soit déjà épinglé à votre ruban.
Ruban d'accueil réduit
![]()
Ruban d'accueil développé

Outlook 2019 ou version ultérieure sur Mac et Outlook sur Mac (Microsoft 365)
Dans Outlook 2019 ou version ultérieure sur Mac et Outlook sur Mac (Microsoft 365)vous pouvez accéder à Jambo pour Outlook à partir du ruban supérieur ou du menu ellipse (trois points) à l'extrême droite du ruban.
Épingler Jambopour Outlook
Une fois ouvert, vous pouvez épingler Jambopour Outlook en place, de sorte que vous n'ayez pas à ouvrir le complément à chaque fois que vous passez à un nouvel e-mail.

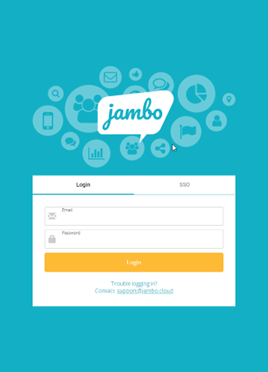
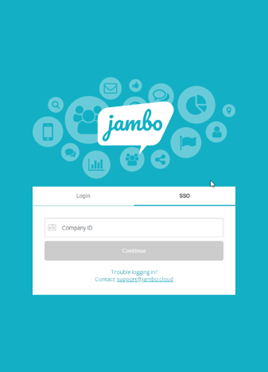
Se connecter à Jambo
Pour utiliser Jambo pour Outlook, vous devez vous connecter à Jambo via l'écran de connexion du complément. Tout d'abord, sélectionnez la région dans laquelle se trouve votre compte, puis cliquez sur connexion.

Vous vous connecterez en utilisant les mêmes identifiants que ceux utilisés pour vous connecter via votre navigateur. Si vous êtes configuré avec l'authentification unique (SSO), vous utiliserez le même identifiant d'entreprise et les mêmes identifiants.
Paramètres
Lorsque vous cliquez sur l'icône d'engrenage en bas à droite, deux options s'affichent : Paramètres et Déconnexion.
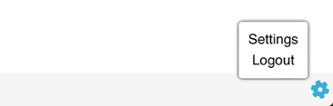
Si vous cliquez sur Paramètres, l'écran suivant s'affichera.

Ici, vous pouvez modifier votre région par défaut. Elle sera automatiquement sélectionnée lors de votre prochaine connexion.
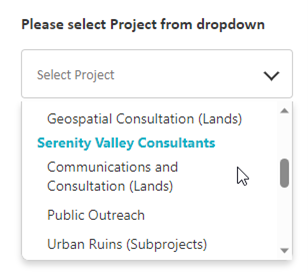
Sélectionner votre projet
Une fois connecté, sélectionnez le projet auquel vous souhaitez vous connecter. Vous ne pouvez accéder aux projets qu'à travers Jambo pour Outlookoù vous avez la permission de créer des communications et des contacts.
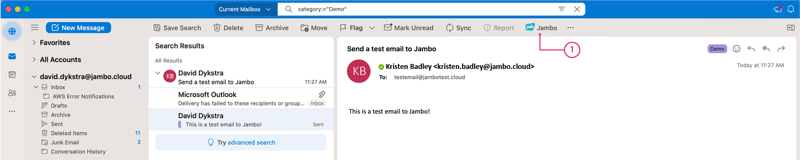
Enregistrer un courriel dans Jambo
Une fois que vous avez sélectionné un projet, vous pouvez enregistrer l'e-mail ouvert dans ce projet en cliquant sur le bouton "Enregistrer dans Jambo".
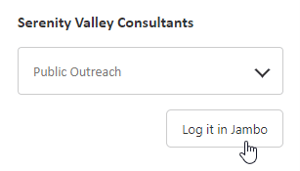
L'enregistrement dans Jambo ouvrira le formulaire d'enregistrement des communications et vous permettra d'ajouter des détails supplémentaires.
Contacts
La section Contacts se remplit automatiquement de personnes et d'organisations sur la base des courriels figurant dans les champs De, À et Cc. Les contacts existants seront marqués d'une case à cocher et tous les contacts cochés seront automatiquement ajoutés à l'enregistrement de la communication. Les contacts figurant dans le champ Cci ne seront ajoutés à votre enregistrement que lors de la création d'un nouveau courriel ; les contacts figurant dans le champ Cci des courriels ajoutés à partir de votre dossier d'envoi ne seront pas ajoutés. Le champ Cci n'est pas inclus dans la version PDF de votre e-mail qui est ajoutée à Jambo en tant que pièce jointe.
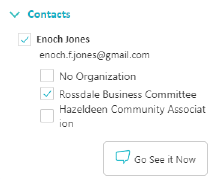
Les contacts qui ne font pas partie du projet et qui ne seront pas ajoutés à l'enregistrement de la communication porteront la mention "Contact exclu".

Création automatique de contacts
La création automatique de contacts est un pack qui fait partie de la suite d'outils de création automatique d'enregistrements de Jambo. Cette fonctionnalité simplifie le processus d'importation de contacts à partir de la création automatique de communications. Elle crée et ajoute automatiquement tous les contacts manquants à l'enregistrement de communication créé.
Si la création automatique de contacts est activée dans votre compte, Jambo pour Outlook affichera "Nouveau contact" au lieu de "Contact exclu".

Si vous ne souhaitez pas inclure ce contact dans l'enregistrement de communication, décochez la case à gauche.
Pour s'assurer que les données saisies sont exactes, le pack de création automatique de contacts dispose d'une fonctionnalité qui vérifie les doublons. Cette fonction utilise l'autorisation de vérification des doublons pour déterminer si des contacts existent en dehors du projet en cours. Si l'utilisateur n'a pas l'autorisation de vérifier les doublons, le processus de création automatique de contacts ne recherchera que les contacts au sein du projet. Si le contact n'est pas trouvé dans le projet, il en créera un nouveau.
Toutefois, si l'utilisateur a l'autorisation de vérifier les doublons, la création automatique de contacts recherchera dans l'ensemble du compte les contacts ayant la même adresse électronique et inclura les détails liés au contact pour ce projet.
Création automatique de contacts propose une liste d'exclusion d'adresses électroniques et de domaines, que seuls les administrateurs de comptes peuvent modifier. Cette fonction empêche la création automatique d'un contact dont l'adresse électronique figure dans la liste d'exclusion ou qui correspond à un domaine figurant dans la liste d'exclusion.
Veuillez consulter la documentation du service d'assistance de Jambo pour plus d'informations sur la manière d'activer cette fonctionnalité.
Représentants
Si une adresse électronique est associée à un représentant dans votre projetcet email n'apparaîtra dans la section des contacts que s'il figure déjà dans la liste des contacts de Jambo. Le représentant sera automatiquement sélectionné dans la liste déroulante des représentants.

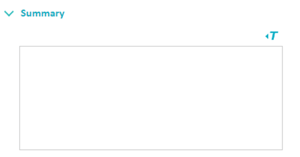
Résumé
La section Résumé de ce champ est la même que dans l'application Web Jambo. Tout ce qui est saisi ici sera ajouté au résumé de l'enregistrement de communication dans Jambo.
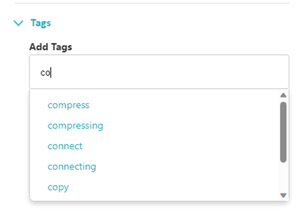
Balises
La section des balises du formulaire vous permet de sélectionner une liste prédéfinie de balises globales et de projet ou d'ajouter de nouvelles balises en fonction de la configuration du projet.
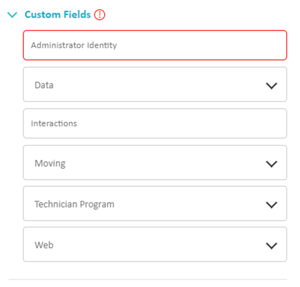
Champs personnalisés
Tous les champs personnalisés des enregistrements de communication disponibles sur pour le projet seront disponibles ici. Si le champ est obligatoire, l'utilisateur doit le remplir avant de l'ajouter à Jambo.
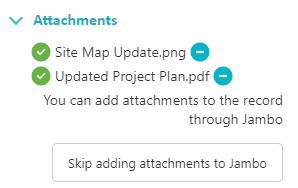
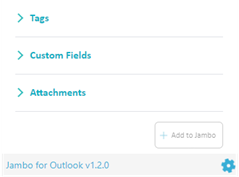
Pièces jointes
Les pièces jointes contenues dans le courriel seront automatiquement ajoutées à la communication. Si vous ne voulez pas de pièces jointes spécifiques, vous pouvez choisir sélectivement celles qui ne seront pas ajoutées en cliquant simplement sur le "-" à côté de la pièce jointe. Une copie PDF de votre courriel sera ajoutée à la section des pièces jointes de l'enregistrement de la communication dans Jambo. Le PDF comprendra toutes les pièces jointes de l'e-mail, même si vous avez choisi de ne pas l'ajouter à Jambo.
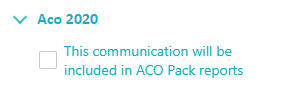
Champs de regroupement
Les packs activés sur le projet qui incluent des champs ayant un impact sur l'enregistrement de la communication sont également disponibles dans Jambopour Outlook.
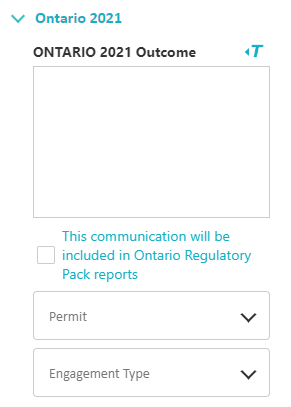
Regroupement ACO
Regroupement Ontario
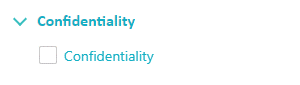
Confidentialité
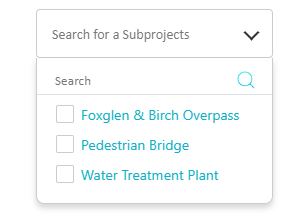
Sous-projets
Ajouter à Jambo ou découper et ajouter à Jambo
Une fois que vous avez rempli tous les champs nécessaires, vous pouvez choisir d'"Ajouter à Jambo", ce qui ajoutera l'intégralité de l'e-mail et toute la chaîne de conversation à Jambo, ou vous pouvez "Rogner et ajouter à Jambo", ce qui ne prendra que l'e-mail le plus récent de la chaîne.

Avertissement pour les fenêtres multiples
Le complément ne fonctionnera pas comme prévu si vous avez plusieurs fenêtres ouvertes en même temps.

Enregistrement Emails quand l'envoi
orsque vous envoyez un courriel à un contact et que vous utilisez Jambo pour Outlook pour créer un enregistrement de communication en même temps, au lieu d'enregistrer le courriel après coup, vous pouvez déclencher le processus de création de l'enregistrement de communication lorsque vous appuyez sur le bouton d'envoi en vous assurant que la case à cocher "Enregistrer dans le projet Jambo lors de l'envoi" est activée. Jambo confirmera que l'enregistrement a été créé et vous indiquera si vous souhaitez terminer l'envoi du courriel.

Note: Pour que cette fonctionnalité fonctionne correctement, il faut que le complément ait été installé par l'administrateur de votre organisation.
Attention: Si vous utilisez Windows Outlook (Classic) - Si vous cliquez sur le bouton "Log to Jambo" et que vous changez d'avis, vous devez décocher la case "Log to Jambo project when sent". La fermeture de l'add-in n'empêchera pas l'add-in d'envoyer le courriel à Jambo.
Attention : Si vous utilisez Outlook pour Mac, la fenêtre Nouveau courriel doit s'ouvrir, sinon le courriel ne sera pas ajouté à Jambo lorsque vous l'enverrez.
Vous pouvez configurer la fenêtre du nouvel e-mail pour qu'elle s'ouvre automatiquement dans les paramètres :

Cliquez sur Composer

Cochez ensuite la case "Ouvrir les nouveaux messages et les réponses dans une fenêtre séparée".

Vérification d'un enregistrement existant
Lorsque vous sélectionnez "Enregistrer dans Jambo", Jambo vérifiera si l'e-mail a déjà été enregistré dans le projet dans lequel vous vous trouvez actuellement.
Vérifications effectuées par Jambo :
- Objet
- Date et heure
- Pour au moins un contact partagé (e-mail)
Si tous ces critères correspondent, Jambo déterminera que l'enregistrement est déjà enregistré et vous suggérera de vérifier l'enregistrement de communication dans Jambo avant de l'enregistrer à nouveau.
Ajout d'un événement à Jambo
Pour ajouter des événements à Jambo, cette fonctionnalité nécessite un accès à l'API Graphique. Il se peut que l'on vous demande de vous connecter à nouveau à votre compte Microsoft pour utiliser cette fonctionnalité.

Cliquez sur Se connecter et suivez les instructions.
Il se peut également que l'on vous dise que vous n'avez pas d'accès. Vous devrez alors contacter l'administrateur de votre service informatique pour qu'il vous accorde un accès afin d'utiliser cette fonction.
Section Détails
La section des détails met en évidence les informations que Jambo attribuera à l'enregistrement de la communication.
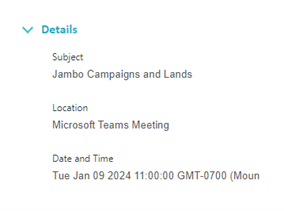
- Objet - deviendra l'objet de la communication.
- Lieu - est ajouté à la section des lieux de l'enregistrement de la communication en tant que lieu personnalisé.
- Date et heure - deviendront la date et l'heure de la communication. Il est important de noter que Jambo utilise le début de l'événement dans Outlook pour définir la date et l'heure dans Jambo. Ainsi, les événements de plusieurs jours apparaîtront le premier jour.
Méthode de communication
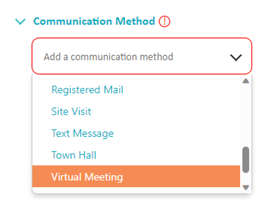
Puisque les événements peuvent être de toute nature, vous pouvez également définir la méthode de communication lorsque vous travaillez avec des événements. Il est important de se rappeler que le champ de la méthode de communication est obligatoire, et Jambo ne peut pas créer d'enregistrement de communication pour vous sans cette information.
Événements entrants
Une fois que vous avez ajouté un événement auquel vous êtes invité, vous pouvez l'ajouter à Jambo de la même manière que vous ajoutez un événement que vous avez créé vous-même.
Vous pouvez également ajouter des événements qui vous ont été transférés. Comme vous ne figurez pas sur la liste d'invitation à l'événement, Jambo ne peut pas vous désigner automatiquement comme représentant. Vous devez mettre à jour la liste des représentants avant d'enregistrer l'enregistrement de la communication.
Événements déjà ajoutés à Jambo (v1.3.0 - mise à jour d'avril 2024)
Étant donné que de nombreux utilisateurs de Jambo peuvent être présents à un événement, avant de vous permettre d'enregistrer l'événement dans Jambo en tant qu'enregistrement de communication, Jambo vérifiera si l'enregistrement existe déjà dans le projet, même si l'événement n'a pas été enregistré dans Jambo par vous.
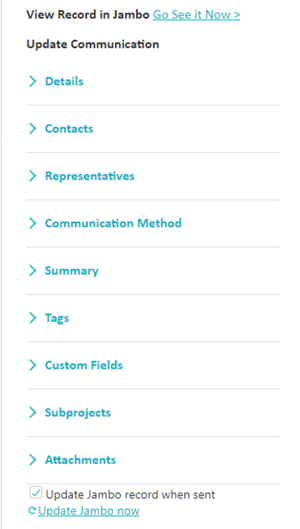
Si Jambo trouve un enregistrement existant, vous pouvez apporter des modifications à l'événement, modifier les champs et mettre à jour l'enregistrement immédiatement en cliquant sur 'Mettre à jour Jambo maintenant' ou lorsque vous envoyez les modifications. Cela facilite la mise à jour immédiate de l'enregistrement.
Remarque : La mise à jour d'un enregistrement n'est disponible que pour les événements et non pour les courriels.
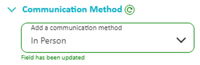
Modifications des champs (v1.3.0 - ajouté en avril 2024)
Chaque fois que des modifications sont apportées à un champ, la section affichera une icône mise à jour pour indiquer que des modifications ont été apportées.
![]()
Les contacts nouvellement ajoutés seront mis en évidence avec un indicateur (!).
![]()
Les contacts supprimés seront mis en évidence avec un indicateur (X).
![]()
Les modifications de champ seront mises en évidence avec un texte indiquant que le champ a été mis à jour.
Avertissement de modifications détectées (v1.3.0 - ajoutée en avril 2024)
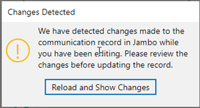
Il est possible que cet avertissement s'affiche de temps à autre. Cela se produit lorsque quelqu'un modifie le même enregistrement dans Jambo pendant que vous essayez de le modifier dans Outlook en même temps.
FAQ
Pourquoi ai-je perdu mon travail lorsque j'ai fermé le panneau des tâches dans le module complémentaire ?
Si vous fermez Jambopour Outlook après avoir saisi des informations, vous perdrez ces informations lorsque le panneau de tâches de Jambopour Outlook se rechargera. Veuillez terminer et envoyer votre enregistrement Jambo avant de changer d'adresse électronique. Vous pouvez également ouvrir l'e-mail dans un nouvel onglet.
Mon contact n'existe pas dans mon projet ; que dois-je faire ?
Si votre contact (individu ou organisation) n'est pas trouvé, veuillez vous connecter à Jambo en ligne et ajouter le contact à votre compte et à votre projet avant de l'utiliser dans Jambopour Outlook. Si nécessaire, vous pouvez toujours les ajouter après coup à l'enregistrement dans Jambo.
J'ai créé un enregistrement pour un courriel de mon dossier d'éléments envoyés ; pourquoi le module complémentaire n'a-t-il pas détecté ces contacts dans le champ Cci ?
Les modules complémentaires Outlook ne peuvent pas détecter les courriels qui apparaissent dans le champ Cci une fois le courriel envoyé. Lorsque vous envoyez un courriel avec des contacts dans le champ Cci que vous souhaitez inclure dans l'enregistrement de communication Jambo, créez l'enregistrement pendant que vous rédigez le courriel.
Désinstallation de Jambopour Outlook
Vous pouvez désinstaller Jambopour Outlook à tout moment via le Microsoft Office Store, accessible depuis votre ruban dans Outlook.
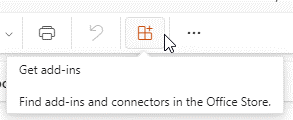
- Une fois que vous avez ouvert le Microsoft Office Store, accédez à « Mes modules complémentaires » à partir de la navigation située sur le côté gauche.
- Faites défiler la page jusqu'à Jambofor Outlook. Sélectionnez les trois points situés dans le coin inférieur droit de la carte Jambofor Outlook.
- Dans le menu disponible, sélectionnez Supprimer.
Vous avez besoin d'aide supplémentaire ? Consultez le Jambo Knowledge Hub ou contactez notre l'équipe Customer Success.